Forum: Promote
Presents
TOXIC IMPULSE
"Desires Fulfilled"
Ultra Drinks Inclusive

Music By: Renaissance
Arif Cooper
An Special Guest Artistes
4
Bars including the special:
"Rum Fest" Bar
@ the gate ladies 2 4 1 b4 11
Visit: http://www.facebook.com/event.php?eid=12355028308 for further details
-- Edited by Jimmy at 00:14, 2008-04-27
http://www.mediafire.com/?sd9bu4hhvys
Do you dream of gliding through the air? Then don't miss today's show when Chris explains how to build your own hovercraft. The project is ultrasimple -- your kids can put it together in the backyard.
What is a hovercraft?
A hovercraft is a vehicle that rides on a cushion of air produced by downwardly directed fans, causing it to glide over surfaces.
How a homemade hovercraft works
Air produced by a small blower inflates a plastic sheet. The sheet pushes against the floor to provide a ground-hugging "skirt." This skirt lifts the entire hovercraft.
A small plastic disk (or coffee-can lid) keeps the inflated plastic anchored so it doesn't tear loose from the center. The plastic disk also lifts up vent holes so air can escape into the center.
What you need before you start
You'll need the following items to build your hovercraft:
- One piece of plywood about 3 to 4 square feet, 3/8 to 1/2 inch thick
- Plastic sheet one foot larger than the plywood
- Leaf blower or shop vac
- Plastic disk such as a coffee can lid
- Bolt: 2 inches, 1/4-20
- Nut: 1/4-20
- Two fender washers
- Staple gun
- Duct tape
Caution: Kids, don't attempt to build or operate a homemade hovercraft without adult supervision.
Build your hovercraft
Now it's time to start building your hovercraft. Follow the steps below and consult this simple diagram.
- Build it: Platform
- Cut plywood into a disk shape.
- Drill a 5/16-inch hole in the exact center so that the 2-inch bolt easily passes through it.
- Cut a hole to exactly fit the hose from the leaf blower or shop vac. Place the hole slightly off-center, about four inches away from the hole for the bolt.
- Build it: Air cushion
- Lay plywood on top of the plastic sheet.
- Fold the edges of the plastic sheet over the plywood and secure it with a staple gun about every four inches.
- Cut off excess plastic sheeting.
- Tape down edges of plastic with duct tape.
- Build it: Vents
- Poke a hole in the center of the small plastic disk.
- Place it on the plastic sheet.
- Cut six small 2-inch vent holes in the sheet about two inches from the plastic disk. Be sure to keep about two inches of plastic between the vent holes.
- Connect with the bolt, nut, and washers.
- Build it: Get ready to go
- Use duct tape to seal any holes and reinforce weak areas.
- Flip the hovercraft over so the plastic sheet is at the bottom.
- Stick the leaf blower or shop vac in the hole and turn it on.
The finished product
Use your homemade hovercraft on a smooth surface like linoleum or TechTV's studio floor. Just turn on the motor, wait for the plastic to inflate, and hop on to glide around. The hovercraft can support hundreds of pounds -- Chris, Cat, and Roger have no problem riding the "Call for Help" hovercraft.
. When you're tired of gliding, give yourself a few feet to come to a complete stop, and turn off the motor.
LIVE INTERVIEW ON DA ONE RADIO w/ PRGIRLANGEL!!!!
TUNE IN AT 5PM AND LISTEN FI MI, THE INTERVIEW WILL BE SHORTLY AFTER THE TOP TEN SOCA COUNTDOWN, AND RIGHT BEFORE THE DANCEHALL COUNTDOWN.
I KNOW YOU HEARD FROM DEVA BRATT LAST WEEK, DONT MISS ME THIS WEEK!
TO MY FANS: EMAIL ANY QUESTIONS YOU WOULD LIKE ME TO ANSWER ON THE AIR TO PRGIRLANGEL@GMAIL.COM, IN THE SUBJECT LINE PUT EXODUS NUCLEAR INTERVIEW
CHECK OUT YOUR FAVORITE PUBLICIST PRGIRLANGEL ON 101.1 SOUTH FLORIDA DA ONE RADIO EVERY SUNDAY FROM 5PM-7PM, STREAMING LIVE ON WWW. DAONERADIO. COM, WITH MY RIGHT HAND SMILEY OF SMILEY GIRL ENTERTAINMENT! FEATURING THE TOP 10 SOCA, AND TOP 10 DANCEHALL COUNTDOWN AND THE MIXUP SEGMENT WITH MISSY
CALL IN AND SHOW SOME LOVE, OR REQUEST A SONG YOU WANT TO HEAR ON THE COUNTDOWN!!!! 954-893-4110~
**WWW. MYSPACE. COM/PRGIRLANGEL
<a href="https://s223.photobucket.com/albums/dd89/PrGirlAngel/?action=view¤t=3GIRLSOFDAONE.jpg" target="_blank"><img src="https://i223.photobucket.com/albums/dd89/PrGirlAngel/3GIRLSOFDAONE.jpg" border="0" alt="Da Girls of Da One"></a>
CHECK OUT SHIFTA BRAND NEW REMIX'S TO LOLLIPOP AND LUV IN DA CLUB
lollipop remix - http://www.zshare.net/audio/11775828efade35b/
love in da club remix - http://www.zshare.net/audio/11775798bae2c0db/
http://www.zshare.net/audio/11677177502e950a/
AND
http://www.mediafire.com/?99mnpbnm2mz#
-- Edited by Lady Magnum at 08:47, 2008-05-10
My MIxtape U-too Disco dancehall mix, for bookings 1876 463-8713
Accessing The Entire Internet On Your 3 Phone, U8110, E616 etc..txt
U WILL HAVE ACCES TO UP TO 10 TIX AT THIS DISCOUNTED PRICE($2000EA)
INTERESTED PERSONS EMAIL production3d@gmail.com or add me to ur msn messenger beautiful_dee2003@hotmail.com
-- Edited by Lady Magnum at 10:02, 2008-04-21
Pan Di Endz -~~D-east (lollipop riddim) 2008 Sick SIck !!!
-- Edited by Deast at 11:33, 2008-05-06
CITY HEAT SOUND TROOPER SOUND IMPERIAL JULY 19 ST ELIZABETH
Please Comment - Demo- Gal dem ting - Black Rain Riddim
http://www.zshare.net/audio/11432222f3645e71/
Tell mi how dis sound zone. Bless
VOTE!!! OMEIL-HOT GIRLS (PORTMORE EMPIRE UNIVERSE 1ST LADY)
Voting will take place today May 06 - 12
The link for voting is:
http://www.wsvnradio.net/local/bestof/vote/volume10poll.html
If any problem occur go to
www.wsvnradio.net
Thanks in advance!!!
Nuff love,
Omeil
***Saydis***PROMO CD***MHAADNESS IT BE MHADNESS!!!!!!***Pree Dis Zone!***
this interview is hilarious di man rhyme out di entire ting.
"not old school...All School"
brand new dance by diamond (pree dis mediazone )
ADM: $1500 PRESOLD & $2000 @ D GATE (REGULAR ONLY DRINKS INCLUSIVE)
V.I.P. $2500 PRESOLD (VIP FOOD AND DRINKS INCLUSIVE)
MUSIC BY ZJ CHROME, ARIF COOPER, DJ DELANO, AFTERSHOCK AND SOLAR SOUNDS. VENUE: CURPHEY PLACE. FROM 9:00PM UNTIL
DRINKS AND FOOD INCLUSIVE ALL NIGHT:
LOCAL AND INTERNATIONAL BARS
APPLETON SPECIALS
SMIRNOFF SPECIALS
VYBZ RUM MIXES
MAGNUM MIXES
VODKA SPECIALS
RED BULL MIXES
PIMP JUICE MIXES
HYPNOTIC MIXES AND SPECIALS
A MAD TING WE WILL MIX ANYTHING U WANT LET YOUR IMAGINATION RUN WILD
CATERERS:
LORRAINE FONG
PRENDY'S
TGIF
RIBKAGE
FOOD FROM:
DOMINOES
PIZZA HUT
KFC
SUBWAY
WENDYS
JUCCI BEEF
PIZZA MANIA
OFCOURSE S.E.X. HAS TO BE SWEET
PASTRIES BY:
CHOCOLATE DREAMS
SUGAR AND SPICE
THE CAKE SHOPPE
AND MANY MORE
WHAT DO YOU PREFER........ S.E.X. OR LIQUOR?
-- Edited by Lady Magnum at 10:06, 2008-04-14
-- Edited by Lady Magnum at 10:21, 2008-04-14
every friday 6-8pm log on to the LOUD'N'LIVELY SHOW with the one named CAMMAN playing the best in BASHMENT & ROOTZ come join the chatroom and win a MIX CD
http://ramjamradio.com/forum/studiochat/
ALL YOU GOT TO DO IS REGISTER on NOW
ALSO PON MEDIAZONEJA.COM
***NEW JAMAICAN ARTIST***Saydis D Greatest...Mhaaddd Ute
http://www.zshare.net/audio/113666190f85eecf/
BORN AND RAISED IN THE COOL, TROPICAL ISLAND OF JAMAICA, ADRIAN *SAYDIS THE GREATEST* GOODALL WAS INSPIRED TO BECOME A RAPPER AFTER BEING ENCOURAGED WHILE LISTENING TO THE LYRICALLY PRONOUNCED TUPAC WHO GAVE SUCH A POSITIVE INSPIRATION TO *SAYDIS* WITH JUST WORDS OF WISDOM AND CLARITY. *SAYDIS* DREAM WAS TO BECOME A PILOT, FLYING IN THE CLEAR BLUE SKY, BUT THAT DREAM HAS FADED AS HE HAS SOLELY DEDICATED HIMSELF TO HIS SECOND NEW DREAM... BECOMING A RAPPER. *SAYDIS* TOOK HIS FIRST JAB AT RAPPING AT THE TENDER AGE OF TWELVE. HIS FIRST TRY FAILED HIM BUT THATS WASNT GOING TO STOP *SAYDIS* HE THEN TOOK ANOTHER SHOT A YEAR LATER WHEN HE RECORDED HIS FIRST FREESTYLE THAT WAS BETTER THAN ANY SONG HE EVER WROTE. THE FREESTYLE WAS WITH A FELLOW RAPPER/FRIEND/FAMILY -_- *SUGAR D* (MAY HIS SOUL REAT IN PEACE). HE CONTINUED TO RECORD IN HIS HOUSE WITH A BROKEN MIC AND HIS OUT DATED LAP TOP, BUT THIS DIDNT DISCOURAGE THE YOUNG RAPPER TO MAKE MAGNIFICENT MUSIC. A FEW SONGS LATER *SAYDIS* WAS BEING RECOGNIZED BY THE MULTITUDE, FELLOW FRIENDS AND FRIENDS OF HIS FRIENDS. THOUGH HE HAS NOT MADE IT TO THE TOP *SAYDIS* CONTINUES TO MAKE MUSIC AND WITH OVER 70 SONGS ALREADY RECORDED, 2 MIXTAPE DEEP HE HAS HIGH HOPES THAT HE WILL BECOME SUCCESSFUL SOME HOW, SOME WAY. *SAYDIS* IS ALSO A POET, AT HEART, SHARING WHAT IS ON HIS MIND AND IN HIS HEART, POEMS FROM *SAYDIS* ARE THE TRUTH AND NEVER TO BE LIES. *SAYDIS* ALSO HAS BIG MOVES IS IN THE MAKING, HIS PRODUCTION TEAM *D.O.R.K PRODUCTIONS* IS CURRENTLY WORKING ON HIS MIXTAPE *ANGER MANAGEMENT*. *SHADOW MAFIA* THE CLIQUE CONSIST OF *SAYDIS* *YOUNG CHRONIC* & *J.FROST*(MORE TO COME) ALL LYRICAL BEASTS. SHADOW MAFIA IS ASSOCIATED WITH SAYDIS BECAUSE THIS WAS THE CLIQUE THAT WAS CREATED 4 YEARS AGO, AND SOON TO ALSO MAKE BIG MOVES WITH A MIXTAPE CALLED M.O.B (MY OTHER BROTHAS). *SAYDIS* IS THE EXECUTIVE PRODUCER OF *YOUNG CHRONICS* MIXTAPE (THE MINISTER OF HUSTLE) SOON TO COME. *SAYDIS THE GREATEST* IS CURRENTLY WORKING ON A MIX TAPE ANGER MANAGEMENT WHICH WILL BE AVAILABLE TO THE PUBLIC EARLY MARCH, 08. THE JAMAICAN RAPPER WHO WANTS TO BE AN AMERICAN LEGEND. TO CONTACT THE ARTISTE CALL: CELL: 1 876 899-1057 HOME: 1 876 704-6985 EMAIL: a_hotty_flirty777@hotmail.com

-- Edited by Delvito at 17:55, 2008-05-01
-- Edited by Delvito at 17:58, 2008-05-01
PRESIDENTIAL CLIK PRESENTS : JAH-T BIRTHDAY BASH 2008
Dancing WE REP (Mad Dance Tune WITH New dances fr D-east
www.myspace.com/sheldonsossullivan Iz the Page to take a listen....so leave comments and all dat!!!! And help to support!!! Plz.....Thanks
Peace and God Bless!!!
Ok zone I have done it again.I have a software that will give you free calls to U.S and Canada .No bullshit!!!.The software also has i.m like msn or yahoo.
FREE CALLS MI SEH !!!!!
Download and read more here:
http://www.oovoo.com/
My Birthday Bash *** A Yellow Affair! (Germany)

L.I.F.E. ANNE-VERSARY *** A YELLOW AFFAIR!
feat.
CODE RED *** CHRIS DYMOND
LEXIE LEE (LIVE)
SENSI MOVEMENT & TOP GUN SOUND!
FLYERS, MIXTAPE, ALBUM, LOGO... EVERYTHING YOU NEED A SUH MI DWEET SEEN
www.myspace.com/iyahgraphics
he work with sound system, Uropean artists, JA artists ...
and it's my breddreen . contact him for pricing ...
email : i-flo (a) hotmail.fr

-- Edited by frantchess at 06:20, 2008-04-27
HOW TO TRACK EMAIL SENDERS IN YAHOO...!! now with country finder
1. Log into your Yahoo! mail with your username and password.
2. Click on Inbox or whichever folder you have stored your mail.
3. Open the mail.
4. If you do not see the headers above the mail message, your headers are not displayed. To display the headers,
* Click on Options on the top-right corner
* In the Mail Options page, click on General Preferences
* Scroll down to Messages where you have the Headers option
* Make sure that Show all headers on incoming messages is selected
* Click on the Save button
* Go back to the mails and open that mail.
5. You should see similar headers like this:Yahoo! headers : nameLook for Received: from followed by the IP address between square brackets [ ]. Here, it is 202.65.138.109.That is be the IP address of the sender!
6. Track the IP address of the sender

RST IP Locator is software that tells you the location of any IP Address, JUST TYPE IP Address and See Where it is..
If want IP of a website go to: run > type cmd > now type ping and site name e.g. ping google.com now you will get the IP put it in IP Locator and and click locate..
http://rapidshare.com/files/108086285/IPLocator2008.rar.htmlthen find there country
-- Edited by selectorbyron at 20:19, 2008-04-20
02 track 2.mp3 - 3.06MB
-- Edited by wikaman at 11:10, 2008-04-23
-- Edited by wikaman at 20:02, 2008-04-23
TELL US WHO YOU WANT TO BE ON THE NEXT MURDA MONDAYZ GOING HEAD TO HEAD PLAYING THE BEST 45s NO DUBZ!
AND IF YOUR REALLY BRAVE PUT YOUR OWN NAME DOWN.
WHO WILL BE THE MEDIA ZONE CHAMPION.
DJ GREEDY 4RM MONEY HUNGRY ENT.... THE FAMINE MIXTAPE VOL 1-- AGO MAD
WHAA GWAAAN MEDIAZONE JUSSS BRUSHIN UP MI MIXTAPE... SEE DA PREVIEW YAH
http://www.mediafire.com/?3mnyyz2yz1q
http://www.imeem.com/people/_aI6bOa/music/zIbN3qrY/dj_greedy_the_famine_preview/
CHECK MI MYSPACE TOO
MYSPACE.COM/MONEYHUNGRYGREEDY
COMMENTS R APRECIATED BLESSS!!!!!!!!!
How To Securely Web Browse via an SSH Tunnel "FIREFOX"
Introduction
These days, you can find a hot spot pretty much anywhere, allowing you free access to roam the Internet without much of a problem. But this isn't exactly a safe way to browse the web, securing any content you might log in with, or post on a webpage that's not the most secure. On the other hand, you might just not want people to know what you're browsing.
I've found many uses for the technique that I'll be describing; it even beats almost all of the content filters out today, providing the ability to securely access whatever you want, so long as you have a few small requirements.
Client / Server Setup
You'll first need an SSH daemon. You can find these anywhere and most webpage hosts give you a login for one when you purchase hosting. You can also use a Linux box of some sort on your home network (This is my method of choice.) This will run remotely, you just need to be able to log into it using an SSH client.
Next, you need an SSH client that supports SSH Tunneling. I've used PuTTy for years, so it's my client of choice.
Finally, you need a network that you don't trust, or that you would just like to cover your tracks on.
I use Firefox for my secure browsing so that I don't have to worry about constantly reconfiguring my browser. I just log into PuTTY, and then open Firefox. This method leaves my Internet Explorer untouched.
I'm assuming the SSH server is already set up. You just have to be able to remotely log in using an SSH client. The majority of Linux distros support this right after the OS is installed (assuming you didn't install a firewall).
I'm using Ubuntu 7.10 server for my SSH daemon. It does everything from webpage hosting, to e-mail, and even backups. This will not affect anything running on that server, so for the most part, it's completely safe.
Now we need to configure PuTTy to connect using Tunnels. Open PuTTy, scroll down the left side to SSH, then Tunnels. In Source port, enter a number that you won't normally use, I chose 8080. Leave the Destination blank, set the first option to Dynamic, and the second to Auto. Click the Add button.

Figure 1: Setting the source port
You should now see D<port> In my case, I have D8080 (Figure 2).

Figure 2: After setting the source port
From here, click Session at the top, enter the SSH server's PUBLIC IP address. You can either use an IP address or a host name. If you have a dynamic IP address, you can use a Dynamic DNS service to make things a lot easier when trying to connect to your home network. Make sure you've selected SSH (default most of the time) and don't worry about changing the port from 22 unless you changed the default SSH port on the box you plan to use.
Type a name in the Save Session so you don't have to go through all of this again. I'm original, so I use Test. Click Save. The name should now appear in the box under Default Settings. If you double-click on the saved name, PuTTY will connect with all of the settings you just entered. You can also hit Load which will load the settings into the client before hand, allowing you to edit them as needed.
Your client is set up! Now for the browser. As I stated earlier, I'm using Firefox. However this technique will work with anything you wish to mask. I even use it for remote desktop connections, effectively giving you your own VPN.
In Firefox, go to Tools > Options > Advanced> Network, then click the Settings button under connections.

Figure 3: Firefox Network Settings
From here, select Manual Proxy Configuration, then under SOCKS Host enter an IP address of 127.0.0.1 and the port number you entered earlier in PuTTy (8080 in this example).
In the No Proxy for box, enter localhost, 127.0.0.1. I use both since some OS's have different addresses for the loopback. However, localhost is the standard name in most cases. Select the SOCKS V4 radio button. V5 might also work, but I've never tried it. Click OK.

Figure 4: Completed Firefox Network Connection Settings
Now enter about:config into Firefox. Enter network.proxy.socks_remote_dns as the filter and double click on the parameter to change the value to true. This will use your SSH connection's DNS, and not the one you're currently connected to. Even when using the tunneled connection, your browser would normally be using the local DNS server. Using the remote, tunneled DNS server removes the risk of someone looking on the DNS server to see the web pages you're viewing.
You're now done! You should be browsing the web using your SSH server. Remember you have to stay connected for this to work. If your shell connection drops, you will lose your Internet access connection in that browser.
As I stated before, this can be used for anything that lets you set a Proxy to connect to the Internet (which is almost everything these days). Most of the settings look the same as the ones above in Firefox. Just make sure to specify a SOCKS proxy.
Happy secure surfing!
How To Convert a Wireless Router into an Access Point
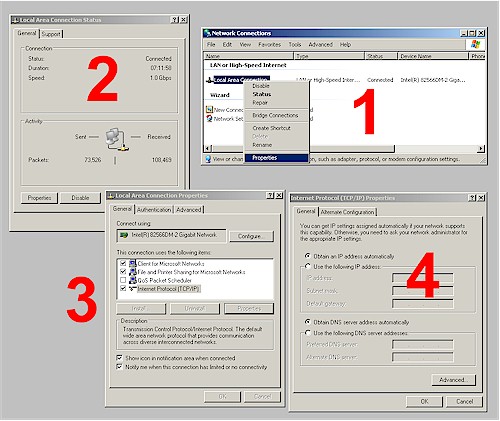
Step 1: Connect a computer that is set to obtain its IP address information automatically to a LAN port on the wireless router that you want to convert to an AP. If you don't know how to do this, Figure 1 shows the applicable Windows XP screens. (Get to the Network Connections window by Start > Settings > Network Connections.)
Figure 1: Checking for "Obtain an IP address automatically"
Log into the admin page of the wireless router that you want to convert to an access point. From here on, I'll call this the "AP".
Step 2: For simple, one segment LANs, there must be only one DHCP server. Your LAN's router has a DHCP server and you don't want the two to conflict. So turn off the DHCP server on the AP. In Figure 2, you can see that the DHCP server in the WRT54G AP has been disabled.

Figure 2: Shut off the DHCP server; change the IP
Step 3: Find your LAN Router's DHCP server range. Figure 3 shows the Basic Network Settings page of the D-Link DGL-4300 that is my LAN's router. This is where the DHCP server controls happen to be. Different routers might have the DHCP server controls on a separate page, so you may have to poke around a little.
Figure 3: LAN router settings
The 4300 normally has its Router IP Address set to 192.168.0.1 by default. But you can see in Figure 3, I changed it to 10.168.3.254. This shifted the DHCP server to the 10.168.3.X subnet instead of the 192.168.0.X. I also could have used 10.168.3.1 or any address as long as it wasn't between 10.168.3.100 and 10.168.3.249, which is the DHCP server's range.
The bottom line is that the my LAN router's DHCP server range is 10.168.3.100 to 10.168.3.249.
Step 4: Change the address of the AP to an unused LAN IP address. This will ensure that you can reach the admin pages of the AP to change settings when needed. Referring back to Figure 2, you can see that I set the AP to 10.168.3.250. Again, this could be any IP from 10.168.3.1 to 10.168.3.99 or 10.168.3.250 to 10.168.3.254, which are all outside the LAN DHCP server range.
Step 5: Connect the AP to the LAN. Unplug the computer you used to configure the AP and plug it back into one of your LAN router's switch ports. Now take an Ethernet cable, plug one end into another unused router switch port and the other end into one of the AP's LAN ports. Be sure to use a LAN port and not the WAN port. Figure 4 shows the proper connection for the WRT54G.
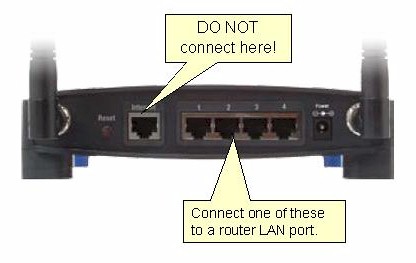
Figure 4: AP connection detail
Step 6: Check the AP LAN connection. You should now be able to use any of your LAN's computers to reach the AP. So open a browser, enter the address that you set for the AP in Step 4 (which is at 10.168.3.250 in this example) and you should get the login prompt.
If you don't get the prompt, recheck that you have the Ethernet cable running from LAN port to LAN port on your router's switch and the AP. The respective port lights on the router and AP should be lit.
Step 7: Check the AP wireless connection. Fire up a wireless notebook or other client and check that it properly associates and pulls an IP address from your LAN router's DHCP server. Congratulations! You now have a new AP!
How To: Setting up File and Printer sharing between two routers
Setting Up
Figure 1 shows a two-router LAN configuration that I'll use as an example. This isn't the only configuration possible, but it will serve to illustrate the points I'll be making.
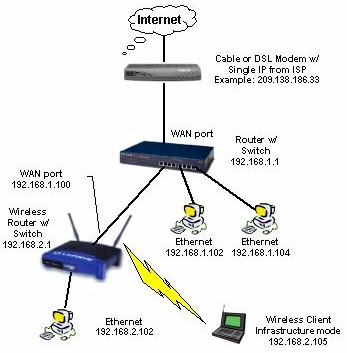
Figure 1: Example of LAN with two routers
First, note that the two routers are set to different base addresses - the wired router to 192.168.1.1 and the wireless router to 192.168.2.1. This is essential for multi-router setups, since without the different address ranges, the routers wouldn't be able to properly build their routing tables. These tables control the way that data is handled and ensure that it is sent to the correct router for delivery to its connected clients. The use of different base addresses puts each router's attached clients into different Class C subnets.
TIP: Class C subnets have a maximum of 254 IP addresses, have the same first three "octets" in their addresses (ex. 192.168.3.X) and use a subnet mask of 255.255.255.0.
Next, note that the second router (the wireless) has its WAN port connected to one of the wired router's LAN ports via a normal UTP patch cable, and that it has an IP address in the first router's range. I've shown the wireless router's WAN IP as 192.168.1.100, but it could be any IP address in the 192.168.1.X subnet.
TIP: You don't have to use the 192.168.X subnets shown in the example. You can use any two private IP address ranges as long as they are different.
Note also that you can either assign the second router's WAN IP statically, or just set it to be a DHCP client (obtain automatically). I suggest the latter option, since if you enter the IP address info manually, you'll need to include the Gateway and DNS information, which you might have trouble figuring out.
Two Problems
Our two-router setup doesn't cause problems with simple Internet use including email, web browsing, instant messaging, and most applications, i.e. anything where you initiate the request for data. But you'll run into two problems when you try to get file and printer sharing going, which I'll now explain.
Problem 1 is that the multiple subnets in our example LAN cause problems with network browsing. This means when you use My Network Places in Win2000 and XP or Network Neighborhood in earlier versions of Windows, the only computers you'll see are those connected to the same router. This problem can be solved by using a WINS server, but there are simpler fixes that I'll describe in the next section.
Problem 2 is caused by each router's firewall. By default, consumer routers block all unrequested data that tries to travel from WAN port (the Internet) to LAN clients, and passes all outbound data from LAN clients to WAN. The blocking of inbound data requests provides the basic "firewalling" function of a NAT router and keeps computers connected to the router's LAN ports inaccessible from the Internet. But this inbound filter gets in the way of Microsoft File and Printer sharing when routers are connected together.
Referring to our example LAN in Figure 1, this means wireless router clients will be able to file and printer share with clients of the wired router, but not vice-versa.
NOTE: This same "one-way" action will also complicate access to servers or server-type applications running on any computers connected to the second router. A simple fix for this problem is to connect those computers to the first router, but the file and printer sharing work-arounds shown later can also be used.
Solution 1 - Disable the second router
Updated September 28, 2005
The easiest way around this whole problem is to not use the second router as a router! After all, it's the NAT firewall that's causing these hassles, and if you don't need it, don't use it!
The only times you really need the second router to act as a router are:
- If you intentionally want to create a protected part of your LAN via the second router's firewall
- You want to c****ine the firewall features of both routers, i.e. port filtering, content filtering, logging, etc.
If you're not trying to accomplish either of the above, then you're better off disabling the second router. Here's how:
1) Choose a LAN computer on the second router and statically set its IP address information to their current values (use the Support tab of the Local area Connection Status window on WinXP and 2000, and Start > Run > winipcfg on Win95 and 98 systems to grab the current IP address info). This will keep the computer that you'll be using for the next steps from losing its IP address info and the ability to connect to the routers.
NOTE: Ignore this step if the computer you choose already has static IP information, and remember to change back to "Obtain an IP address automatically" if you weren't using a static IP setup.
2) Turn off the DHCP server in the second router. The first router also has a DHCP server, and you don't want the two to conflict when you connect them.
3) Change the address of the second router so that it's in the same subnet as the first router and doesn't conflict with the first router's base IP address or DHCP server range. This will ensure that you can reach the admin server of the second router from any LAN machine.
For our example setup, the first router base address is 192.168.1.1 with DHCP server range of 192.168.1.100 to 192.168.1.150. So set the second router base address to any IP address between 192.168.1.151 to 192.168.1.254
NOTE: Once you make this change, the computer you're using will no longer be able to communicate with either router because it is set to an IP address in the subnet you just got rid of. So go back into the computer's TCP/IP properties and change it back to "Obtain an IP address automatically" (and do a DHCP release / renew) or set its IP address info statically.
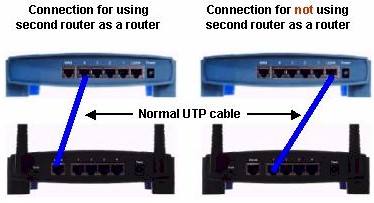
4) Once you take care of the items above, connect a LAN uplink port on one router and a LAN normal port on the other. It doesn't matter which you use on which router, but don't use the Uplink ports on both routers! If neither router has an uplink port, just use a crossover cable to connect any LAN port on one box to any LAN port on the other. Figure 2 shows an example of the two interconnection schemes when one router has an uplink port.
Figure 2: Router interconnection
Note that since you're no longer using the routing part of the second router, none of the WAN (or Internet) setup parameters matter. You can just leave them as they are... they won't affect anything.
Congratulations! You've just turned that second router into a dumb switch and/or access point, and your sharing troubles are over!
Solution 2 - Sharing via IP address
If you really do need two routers, you're going to have to live with limitations on File and Printer sharing and Network Browsing. As mentioned previously, computers attached to each router will be able to browse and file and printer share with other clients attached to the same router. But only computers attached to the second router will be able to exchange files with computers attached to the first router, and the clients attached to the second router must initiate the file transfers.
If you can live with this limitation, here's how to access a remote shared folder or drive:
1) Assign a static IP address to the computers that you want to have access to. This is important since you'll be accessing them by IP address, not name, and if the remote computer(s) lease a different IP address at DHCP renewal time, you'll have to track down and use their new address.
NOTE! Make sure you use static IP addresses outside the range of the router's DHCP server. For our example setup, the first router has a DHCP server range of 192.168.1.100 to 192.168.1.150. So be sure to assign static IPs from 192.168.1.151 to 192.168.1.254.
2) Open up a Run window (Start > Run) and type in followed by the IP address of the computer that you want to access. (I'm assuming that you've already shared the desired drive or folder on that computer). Figure 3 shows how it's done for a computer with IP address 192.168.1.102.
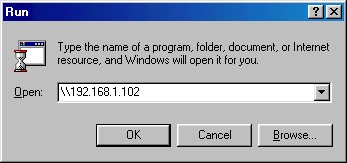
Figure 3: Accessing a remote computer
After a short wait, a window should open containing the shared drives and folders of the remote computer. Figure 4 shows the shared items on the computer I reached at 192.168.3.154.
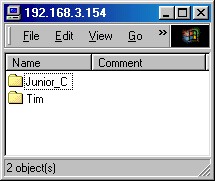
Figure 4: Shared items on 192.168.3.154
TIP: You can also use Windows' Find Computer function. Just omit the leading "" and type in only the IP address of the machine you're looking for.
3) To avoid having to go through all these hoops the next time you want to access a remote shared file, just right-click on any of the items shown in the window opened in Step 2, choose Create Shortcut or Map Network Drive. (If you're using WinXP, you can find Map Network Drive in My Computer > Tools). Then all you'll need to do the next time you want to access the shared item is to double click on the shortcut or open the drive in My Computer.
It's also possible to use computer names instead of IP addresses to find remote computers by editing the LMHOSTS file on specific computers. But since this doesn't get network browsing working and can be difficult to maintain, I don't recommend you mess with this.
Going the other way
My earlier statement that clients connected to the first router won't be able to access any clients attached to the second router for file and printer sharing actually isn't entirely true. By using the second router's DMZ (or exposed computer) function you can actually share in this direction, but for only one second router client at a time.
All you need to do is put the IP address of the computer you want to share in DMZ, then use the WAN IP address of the router when you go to access the computer. You don't have to worry about weakening security for the computer that you put in DMZ, since it's already protected by the first router's firewall. But if you're really paranoid, you can open just TCP and UDP ports 137, 138, and 139 to the IP address of the computer that you want to access instead of putting it in DMZ.
Conditions: you have installed Vista and now you want Xp in the second boot, and when you do so , your Vista isnt detected anymore, so now you either format your Drives and install again, or you repair Vista and thats ok,
But you can run both in Dual boot without formatting,
As vista is installed, you install Windows Xp in X:> (X is the drive of your Choice) (may be D: , E: etc)
now your comp. restarts in XP without showing Vista, dont worry just restart your COmp. and boot from VIsta CD/DVD whatever you have, repair your installation and now your VISTA boots up, without Showing Xp, but nothing to worry,
Just Place your Vista DVD/CD int he drive in VISTA and now go to start menu, all programs , accessories , right click on command prompt
and click on run as administrator
now type these commands :
Use Bootsect.exe to restore the Windows Vista MBR and the boot code that transfers control to the Windows Boot Manager program. To do this, type the following command at a command prompt:
Drive:\boot\ Bootsect.exe NT60 All
In this command, Drive is the drive where the Windows Vista installation media is located.
Use Bcdedit.exe to manually create an entry in the BCD Boot.ini file for the earlier version of the Windows operating system. To do this, type the following commands at a command prompt.
Note: In these commands, Drive is the drive where Windows Vista is installed.
Drive:\Windows\system32\Bcdedit create {ntldr} d Description for earlier Windows version
Note In this command, Description for earlier Windows version can be any text that you want. For example, Description for earlier Windows version can be "Windows XP or Windows Server 2003." Drive:\Windows\system32\Bcdedit set {ntldr} device partition=x:
Note: In this command, x: is the drive letter for the active partition.
Drive:\Windows\system32\Bcdedit set {ntldr} path \ntldrDrive:\Windows\system32\Bcdedit displayorder {ntldr} addlast
Restart the computer.


